

Imagine buying a quality drill.
It feels solid.
Powerful.
Disclaimer:
Our recommendations are based on extensive experience with and/or knowledge of these products, and we do so not because of the modest commissions we could earn but rather because we believe they are actually beneficial and useful. We are honored to be these tools' affiliates. We might receive commissions from Amazon, and other merchants when you buy something after clicking one of our links. Our affiliate policy is covered in more detail here. If you don't think these things will help you accomplish your goals, please don't spend any money on them.
Built to last.
Five years later, your neighbor owns the exact same model.
His still runs like new.
Yours sounds tired, struggles under load, and occasionally smells like something inside is considering retirement.
What happened?
Probably not abuse.
More likely… neglect.
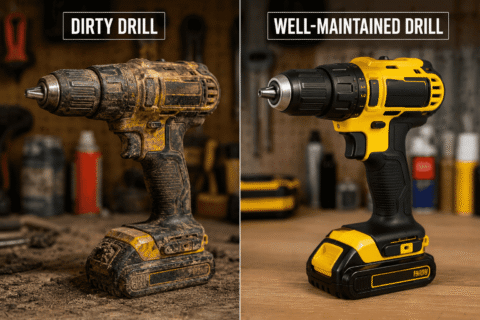
One of the biggest misconceptions in DIY is that quality tools take care of themselves.
They don’t.
Dust slowly works its way into moving parts.
Moisture quietly begins forming rust.
Old grease hardens.
Wood sap sticks to blades.
Metal shavings find places they were never invited.
None of these problems ruin a tool overnight.
That’s exactly why they’re so dangerous.
They happen slowly enough that most people don’t notice until performance starts to decline.
The good news?
Tool maintenance isn’t difficult.
In fact, a few simple habits after each project can dramatically extend the life of everything from a basic hammer to an expensive cordless drill.
Even better, clean tools are usually:
- Safer to use
- More accurate
- Easier to handle
- Less likely to fail unexpectedly
- More enjoyable to work with
And let’s be honest…
There’s something strangely satisfying about opening a toolbox where every tool is clean, organized, and ready for the next project.
Because maintaining tools isn’t really about keeping them shiny.
It’s about making sure they’re ready when the next idea turns into the next DIY project.
Why Dirty Tools Cost You Money
When people think about dirty tools, they usually picture something cosmetic.
A little dust.
Some dried paint.
Maybe a few rust spots.
“I’ll clean them later.”
The problem is that dirt rarely stays on the surface.
It slowly begins affecting the way a tool performs.
And once performance drops, everything else starts following.
Dirt Creates Friction
Think about a pair of pliers.
After months of use, tiny metal particles, sawdust, and grime begin collecting around the pivot joint.
At first, you don’t notice.
Then the movement feels slightly stiffer.
A few months later, opening and closing the pliers no longer feels smooth.
The dirt didn’t break the tool.
It simply created friction.
And friction is one of the quietest enemies any tool has.
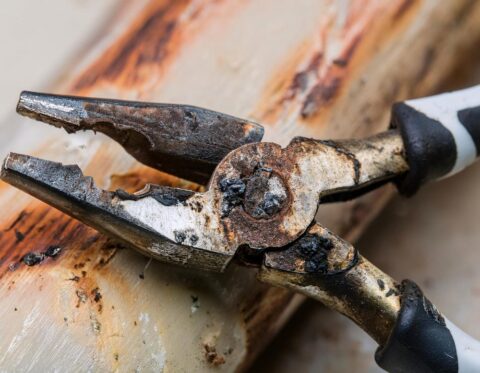
Rust Never Starts Big
Nobody walks into the workshop and suddenly discovers an entire hammer covered in rust overnight.
It starts with a tiny orange spot.
Easy to ignore.
Then another.
Then another.
Eventually that light surface rust begins affecting moving parts, cutting edges, or precision surfaces.
That’s why experienced DIYers don’t wait until rust becomes a problem.
They stop it while it’s still just a stain.
Dirty Tools Make Poor Work
Have you ever tried drawing a straight line with a tape measure covered in sawdust?
Or cutting with a saw blade coated in sticky resin?
Or driving screws with a screwdriver tip packed with old paint?
The tool still works.
Just not as well.
Clean tools grip better.
Cut cleaner.
Measure more accurately.
And simply feel better in your hands.
Sometimes improving your results isn’t about buying a better tool.
It’s about taking better care of the one you already own.
Neglect Is Surprisingly Expensive
Here’s a simple comparison.
Spending ten minutes cleaning your tools after a weekend project costs almost nothing.
Replacing:
- A rusted saw blade
- A seized pair of pliers
- Worn screwdriver bits
- A damaged drill chuck
Costs considerably more.
Good maintenance is one of the few DIY habits that actually saves money while protecting the tools you’ve already paid for.
Your Future Self Will Notice
Cleaning tools is a little like backing up your computer.
The reward isn’t immediate.
Nothing exciting happens.
But months later, when your drill still runs smoothly, your pliers open effortlessly, and your measuring tools remain accurate, you’ll quietly benefit from dozens of small maintenance sessions you almost skipped.
It’s hard to appreciate maintenance in the moment.
It’s very easy to appreciate the lack of repairs later.
Maintenance Is Part of the Project
Many beginners think the project ends when the last screw is tightened.
Experienced DIYers know there’s one final step.
Wipe the dust away.
Remove the debris.
Inspect the tool.
Put it back ready for the next job.
That small routine doesn’t just protect your tools.
It protects every project you’ll build with them in the future.
Because well-maintained tools don’t simply last longer.
They make you a better DIYer every time you pick them up.
Cleaning Hand Tools Properly
Hand tools have one major advantage over power tools.
They’re simple.
No batteries.
No electronics.
No motors hiding inside.
That simplicity also makes them remarkably easy to maintain.
The goal isn’t to make them look brand new.
It’s to remove the things that slowly shorten their lifespan.
Step 1: Remove Dust and Debris
Start with the obvious.
Before reaching for cleaners or lubricants, remove loose dirt.
A stiff nylon brush works well for:
- Sawdust
- Metal filings
- Dry mud
- Concrete dust
- General workshop debris
For tight corners and moving joints, an old toothbrush often reaches places larger brushes can’t.
Think of this as sweeping the workshop before painting the walls.
There’s little point applying oil over layers of dirt.
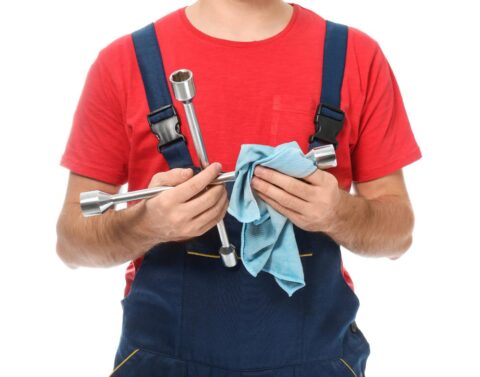
Step 2: Wipe Away Grease and Grime
After brushing, wipe every tool with a clean microfiber cloth.
If grease, sap, or sticky residue remains, use a mild degreaser or warm soapy water on the cloth—not directly on the tool.
This is especially useful for:
- Pliers
- Adjustable wrenches
- Hammers with rubber grips
- Screwdrivers
- Measuring tools
A clean handle doesn’t just look better.
It provides a safer, more secure grip, especially when your hands become sweaty during longer projects.
Step 3: Dry Everything Completely
Here’s where many people accidentally create the very problem they’re trying to prevent.
Moisture.
Even a small amount of water left around a pivot joint or inside a toolbox can encourage corrosion over time.
After cleaning, dry every tool thoroughly with a clean cloth.
If you’ve washed heavily soiled tools, leave them on a dry bench for a few minutes before putting them away.
Never trap moisture inside a closed toolbox.
Step 4: Lubricate Moving Parts
Cleaning removes dirt.
Lubrication restores smooth movement.
A single drop of light machine oil on moving joints is often enough for:
- Pliers
- Adjustable wrenches
- Tin snips
- Locking pliers
- Pruning shears
Open and close the tool several times to distribute the lubricant evenly.
More oil isn’t better.
In fact, excess lubricant tends to attract fresh dust and dirt much faster.
Step 5: Inspect Before You Store
This may be the most valuable step of all.
Cleaning naturally slows you down long enough to notice problems.
Look for:
- Loose handles
- Cracks
- Bent jaws
- Rounded screwdriver tips
- Rust beginning to form
- Damaged cutting edges
Finding these issues early is far easier—and usually much cheaper—than discovering them halfway through your next project.
A Five-Minute Habit That Pays You Back
You don’t need to deep-clean every tool after every job.
That’s unnecessary.
But spending five minutes brushing, wiping, drying, and inspecting the tools you actually used creates a habit that pays dividends for years.
It’s a small investment after each project.
Yet it’s one of the simplest ways to keep your toolbox feeling dependable every time you open it.
Because the best-maintained tools aren’t the ones cleaned once a year.
They’re the ones that receive a little attention, consistently.
Cleaning Power Tools Safely
Cleaning a hammer is fairly straightforward.
Cleaning a cordless drill requires a little more thought.
Power tools contain moving parts, electrical components, cooling systems, and precision mechanisms that don’t appreciate dust, moisture, or careless cleaning.
The good news is that maintaining them isn’t complicated.
You simply need to clean them differently.
Step 1: Disconnect the Power Source
Before doing anything else, make the tool completely safe.
- Unplug corded tools.
- Remove the battery from cordless tools.
- Wait for moving parts to come to a complete stop.
It sounds obvious.
Yet many maintenance accidents happen because someone thought,
“I’ll just give it a quick wipe.”
Good maintenance always starts with good safety.
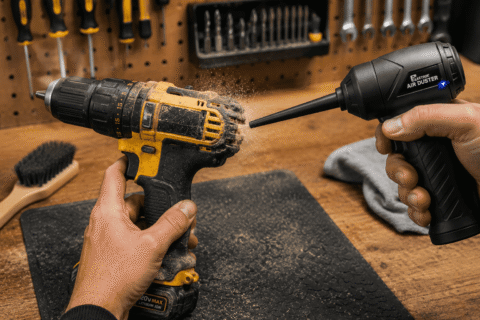
Step 2: Blow the Dust Out—Don’t Push It In
Power tools breathe.
Every time a drill, sander, circular saw, or router runs, its cooling fan pulls air through the housing.
Unfortunately, that air also carries:
- Fine sawdust
- Drywall dust
- Metal particles
- Concrete dust
Over time, these particles settle inside the vents and around internal components, reducing airflow and making the motor work harder.
This is where a workshop blower or electric air duster earns its place.
A few short bursts of air help remove loose debris from cooling vents and hard-to-reach areas without opening the tool.
Think of it as helping the tool breathe properly again.
(Future Guide: Best Electric Air Dusters for DIY Workshops)
Step 3: Wipe the Exterior
Once the loose dust is gone, wipe the housing with a slightly damp microfiber cloth.
Pay extra attention to:
- Handles
- Triggers
- Rubber grips
- Battery compartments
These are the surfaces you touch every time you work, and keeping them clean improves both comfort and grip.
Avoid spraying cleaners directly onto the tool.
Apply them to the cloth first.
Step 4: Inspect Cords, Batteries, and Moving Parts
Cleaning is also the perfect opportunity for a quick inspection.
Check for:
- Cracked power cords
- Damaged battery terminals
- Loose screws
- Worn brushes (where applicable)
- Blocked cooling vents
- Damaged guards
Spotting a small issue today is much easier than dealing with a failed tool halfway through tomorrow’s project.
Step 5: Store It Ready for the Next Job
Once the tool is clean and completely dry, return it to a clean, dry storage space.
Avoid leaving power tools in damp garages, exposed garden sheds, or the back of a vehicle for long periods.
Moisture, heat, and dust often do more long-term damage than the work itself.
Dust Is the Silent Enemy
Most power tools don’t fail because someone used them too often.
They fail because dust quietly built up where nobody thought to look.
That’s why many professionals spend a few minutes cleaning their tools after every particularly dusty project.
It’s not because they’re obsessed with spotless equipment.
It’s because they’ve learned that a clean motor usually lasts longer than a dirty one.
And replacing a few minutes of maintenance is far cheaper than replacing a quality power tool.
The 10 Minutes That Can Add Years to Your Tools
There’s a moment at the end of every DIY project that most people completely overlook.
The last screw is tightened.
The shelf is mounted.
The repair is finished.
You take one look at the mess, think “I’ll deal with that later,” and toss the tools back into the toolbox.
Project complete.
Or is it?
For many experienced DIYers, the project isn’t finished until the tools are ready for the next one.
That final ten minutes often makes the biggest difference over the life of a tool.
A Simple End-of-Project Routine
You don’t need an elaborate maintenance schedule.
You just need a consistent one.
Before putting your tools away, take a few minutes to:
- Brush off dust and debris.
- Wipe away grease or fingerprints.
- Blow dust out of power tool vents.
- Check for loose parts or early signs of wear.
- Add a drop of lubricant to moving joints if needed.
- Return each tool to its proper place.
None of these jobs takes very long.
Together, they can add years to the life of your equipment.
Maintenance Is Easier Than Repairs
Imagine two homeowners who bought the same cordless drill.
One spends ten minutes maintaining it after particularly dusty projects.
The other throws it into the toolbox exactly as it is.
Five years later, which one is more likely to have:
- Smooth bearings?
- Clean ventilation?
- Reliable battery contacts?
- A motor free from packed dust?
Neither person worked harder.
One simply developed a habit.
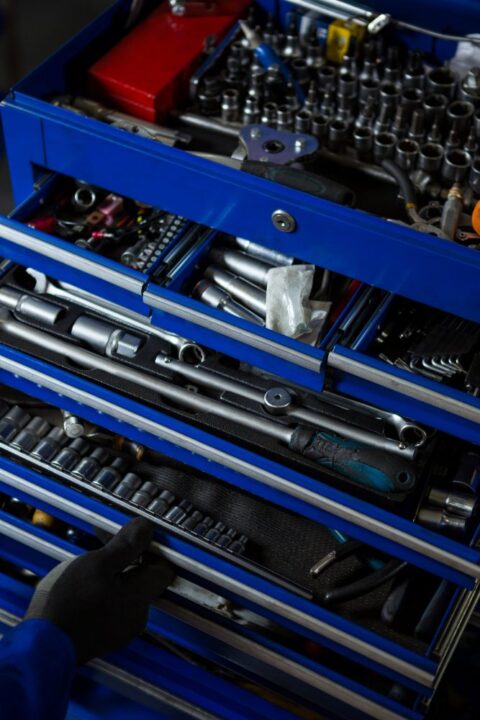
The Toolbox Is Part of the Maintenance
Here’s something many DIYers don’t think about.
Cleaning a tool is only half the job.
Where you store it matters just as much.
A clean drill placed into a damp toolbox.
A freshly oiled pair of pliers lying in metal shavings.
A tape measure buried beneath wet gardening gloves.
None of those tools stay clean for very long.
Good maintenance doesn’t end with the cloth.
It ends when every tool is returned to a clean, dry, organized storage space.
Related Guide: How to Organize and Store Your DIY Tools Like a Pro
Small Habits Build Reliable Tools
One of the biggest myths in DIY is that experienced people simply own better equipment.
Sometimes they do.
More often, they simply take better care of it.
They don’t wait until something feels wrong.
They notice small problems while they’re still easy to fix.
A loose screw.
A worn blade.
A little surface rust.
A battery contact that needs cleaning.
These tiny maintenance moments rarely feel important on their own.
Over years of DIY, they become the reason one toolbox still feels dependable while another is filled with tools that are “good enough for now.”
Future You Will Be Grateful
Maintenance is one of the few DIY jobs where someone else gets most of the reward.
Not today’s version of you.
Tomorrow’s.
Or next month’s.
Or the version of you standing in the garage on a Saturday morning, reaching for a drill that still runs smoothly because you took ten extra minutes after the last project.
That’s a pretty good return on investment.
Especially considering those ten minutes probably saved far more time than they ever cost.
When Cleaning Isn’t Enough
Cleaning is one of the best things you can do for your tools.
But it isn’t a miracle cure.
Sometimes a tool is trying to tell you something.
The trick is knowing the difference between:
“This just needs a good cleaning.”
and
“This needs a little more attention.”
Learning that difference can save both money and frustration.
Rust Is a Warning, Not a Life Sentence
Finding a small patch of rust doesn’t mean a tool belongs in the trash.
In fact, surface rust is one of the easiest maintenance problems to solve—if you catch it early.
Ignore it, however, and it slowly begins working its way into the metal.
That’s why experienced DIYers don’t panic when they spot rust.
They act.
A few minutes today can prevent hours of restoration later.
Related Guide: How to Remove Rust from Hand Tools Without Damaging Them
Lubrication Keeps Everything Moving
Have you ever picked up a pair of pliers that felt stiff?
Or an adjustable wrench that no longer opened smoothly?
Often, the problem isn’t damage.
It’s simply that the lubricant protecting the moving parts has disappeared.
Cleaning removes dirt.
Lubrication replaces protection.
The two work together.
One without the other is only half the job.
Related Guide: Choosing the Best Lubricants for DIY Tools
Sharp Tools Are Safer Tools
This surprises many beginners.
A dull tool is often more dangerous than a sharp one.
Why?
Because dull edges force you to use more pressure.
More pressure means less control.
Less control increases the chances of slips, damaged materials, and injuries.
Whether it’s a chisel, pruning shears, or a hand saw, maintaining a sharp edge isn’t just about performance.
It’s about working more safely.
Related Guide: How to Sharpen Common DIY Tools at Home
Storage Is the Final Layer of Protection
Imagine spending ten minutes cleaning every tool after a project…
…only to throw them into a damp toolbox where metal shavings, loose screws, and moisture are waiting.
That effort disappears surprisingly quickly.
A clean, dry, organized storage space protects everything you’ve just done.
Good storage isn’t separate from maintenance.
It’s the final step of maintenance.
Because the way you store your tools determines the condition you’ll find them in next weekend.
Related Guide: How to Organize and Store Your DIY Tools Like a Pro
Maintenance Is a System
One of the biggest lessons experienced DIYers eventually learn is this:
No single maintenance habit keeps tools alive.
It’s the combination that works.
Clean them.
Inspect them.
Lubricate them.
Sharpen them when necessary.
Store them properly.
None of those jobs takes very long on its own.
Together, they can keep a good tool performing reliably for decades.
That’s why professional workshops don’t think in terms of cleaning.
They think in terms of maintenance.
And once you make that shift, taking care of your tools stops feeling like another chore.
It simply becomes part of building things well.
Frequently Asked Questions
How often should I clean my DIY tools?
It depends on how often you use them, but a quick clean after every project is a good habit to develop.
You don’t need to deep-clean every tool each time. Simply removing dust, wiping away moisture, and checking for obvious damage takes only a few minutes and prevents many long-term problems.
Can I use water to clean my tools?
For most hand tools, a damp cloth or mild soapy solution is perfectly acceptable—as long as you dry the tool thoroughly afterward.
Power tools are different.
Avoid letting water enter vents, switches, battery compartments, or motors. Instead, use a microfiber cloth and remove dust with a workshop blower or electric air duster.
What causes tools to rust?
Rust forms when bare steel is exposed to moisture and oxygen over time.
Leaving tools in damp garages, storing them while they’re still wet, or ignoring small rust spots are some of the most common causes.
Fortunately, surface rust is usually easy to remove if caught early.
Should I lubricate my tools after every cleaning?
Not always.
Tools with moving joints—such as pliers, adjustable wrenches, pruning shears, and tin snips—benefit from occasional lubrication.
The key is moderation.
A single drop of light machine oil is usually enough. Excess oil tends to attract dust and dirt, creating more work later.
Is compressed air safe for cleaning power tools?
Yes, provided it’s used correctly.
Short bursts of air are ideal for removing loose dust from cooling vents and hard-to-reach areas.
Many DIYers now prefer rechargeable electric air dusters because they’re reusable, quieter, and don’t lose pressure like disposable air cans.
Avoid blowing dust deeper into the tool or holding the nozzle too close to delicate components.
How should I store my tools after cleaning?
Store them in a clean, dry place where they’re protected from moisture, dust, and accidental damage.
A well-organized toolbox, tool chest, or wall storage system not only protects your tools but also makes your next project more enjoyable because everything is exactly where you expect it to be.
What’s the biggest maintenance mistake beginners make?
Waiting until something feels wrong.
By the time a tool becomes stiff, rusty, dull, or unreliable, the problem has often been developing for weeks or months.
Small, regular maintenance sessions are far easier—and far less expensive—than major repairs or replacements.
Pro DIY Takeaway
Most people believe good tools last a long time because they’re well made.
Experienced DIYers know the truth is a little different.
Good tools last a long time because someone cared for them.
A five-minute maintenance routine after each project may not feel important today.
But months from now—when your drill still runs smoothly, your pliers move effortlessly, and your tape measure works like new—you’ll be glad you made it a habit.
Taking care of your tools isn’t really about protecting steel, plastic, or batteries.
It’s about protecting every future project those tools will help you build.
Final Thoughts
Every DIY project teaches a lesson.
Some teach patience.
Others teach precision.
A few teach you that the hardware store closes five minutes before you arrive.
Tool maintenance teaches something different.
It teaches respect.
Respect for the equipment that helps you build, repair, and create.
You don’t need expensive products or complicated routines.
You simply need consistency.
Brush away the dust.
Wipe off the moisture.
Inspect for small problems.
Store your tools properly.
Repeat.
Those simple habits may never be the most exciting part of a DIY project.
But years from now, when you’re still reaching for tools that work as well as the day you bought them, you’ll realize they were among the most valuable.
Because maintaining your tools isn’t time lost.
It’s an investment in every project you’ll build next.


